
Using an Offset or Piggyback Red Dot Alongside Your Scope
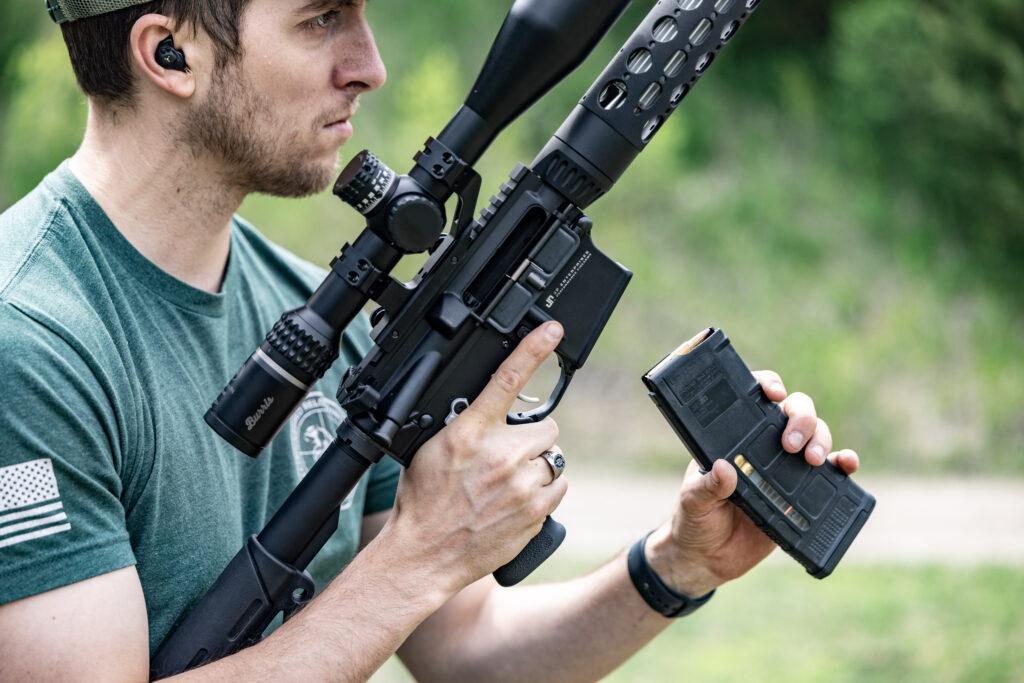
There’s a reason you’re seeing more rifles topped with both a magnified scope and a small red dot these days. It’s not just tactical style points—there’s real function behind the setup. Whether you’re shooting 3-Gun, chasing prairie dogs, or just tinkering at the range, pairing a red dot with a scope gives you fast transitions and flexibility that a single optic can’t match.
What’s the Idea Behind Running Two Optics?
Think of it like having both a zoom lens and a wide-angle lens on your camera at the same time. Your magnified scope handles the long shots—100 yards and beyond—while the mini red dot takes care of the “up close and now” work.
In practical terms, that means you can keep your magnified optic zeroed for precision shots and simply roll the rifle a few degrees to pick up the red dot for close-range targets. The red dot doesn’t require head position perfection or eye relief—just point, see, and shoot.
Offset Mounts: the 45-degree Shortcut
The most common setup is an offset mount—a small 45-degree bracket that attaches either to your top rail or directly to your scope tube. It holds the red dot slightly off to the side so that by tilting the rifle, the shooter instantly transitions to the dot.
It’s popular in 3-Gun competition, where speed is everything. Competitors move from 300-yard steel to 10-yard paper in seconds. Rather than spinning turrets or cranking down magnification, they simply roll into the offset sight.
If you’ve ever tried shooting a coyote that popped up at 20 yards while your scope was zoomed to 10x, you’ll understand the appeal.
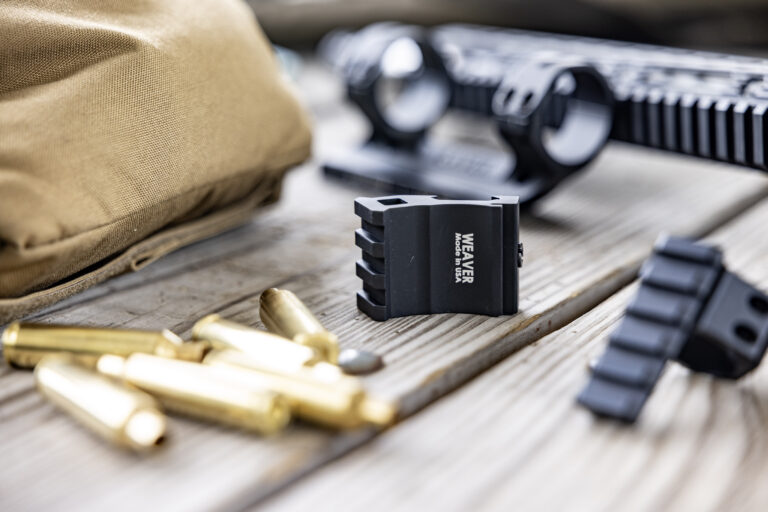
Pro tip: When choosing an offset mount, make sure it positions the optic far enough forward that the ejection port and charging handle stay clear. Weaver’s Tactical Offset Mounts keep the footprint tight while holding zero even after recoil and rough handling.
Piggyback Mounts: the Stacked Approach
Another method is the piggyback mount, which puts the mini red dot on top of your main scope—often using the rear ring cap or a dedicated platform built into the mount sometimes called diving boards. This style keeps everything perfectly vertical, which some shooters prefer for bench or prone shooting.
You’ll see this often on AR-10s, long-range gas guns, or varmint rifles, where the shooter doesn’t need lightning-fast transitions but wants a quick way to handle a close-in critter or a running target without losing cheek weld.
The downside? Piggyback dots ride higher, meaning your head comes off the stock to use them. But for hunting or casual shooting, that trade-off is minor—and it looks pretty slick.
Why it Works So Well
The key benefit here is speed. A red dot gives near-instant sight picture, and when it’s mounted alongside a magnified optic, you’re bridging the gap between two shooting worlds.
- Close targets: Tilt and fire. No zoom ring, no guesswork.
- Medium to long range: Roll back upright, settle into your scope, and dial in precision.
For shooters who split time between the bench and the field, or between PCC matches and hog hunts, it’s the best of both worlds.
Things to Keep In Mind
No setup is perfect, and dual optics come with a few considerations:
- Weight: Two optics and an extra mount add ounces—sometimes noticeable ones.
- Training: You’ll need practice to make transitions smooth and instinctive. Dry-fire drills help a lot.
- Zeroing: Remember, your red dot’s zero will differ slightly due to the offset angle. Confirm it at the range.
- Durability: Cheap mounts can shift under recoil. Stick with precision-machined aluminum like Weaver’s rings and tactical rails that hold torque and alignment.
Offset or piggyback red dots are not just for competition shooters. They’re practical tools for anyone who faces varying target distances in the same outing.
- Varmint and predator hunters can use the scope for long prairie shots and the red dot when something breaks cover at 30 yards.
- Range shooters can experiment with drills that switch targets at multiple distances.
- Tactical enthusiasts appreciate how seamlessly they can clear corners or engage fast targets without changing their optic.
Choosing the Right Setup for You
Start by deciding what kind of rifle you’ll be running. On an AR-15 or modern sporting rifle, a 45-degree offset mount is often ideal. On a bolt-action varmint gun, a piggyback might feel more natural.
Next, pick a sturdy, repeatable base—something that won’t lose zero when you torque it down or bump it in the field. Weaver’s lineup of Tactical 45-Degree Offset Mounts, AR Cantilever Mounts, and Top-Mount Picatinny Rings covers both styles and keeps compatibility simple.
Mini red dots like the Burris FastFire, Trijicon RMR, or Holosun 507C pair perfectly with these mounts, offering crisp dots that stay bright even in full daylight.
Practice Makes It Second Nature
A dual-optic setup feels odd the first few times. Tilting the rifle and reacquiring the dot can be clunky—until your muscle memory takes over. After a few sessions, you’ll be surprised at how natural it becomes.
Try running simple transition drills: start with the rifle canted and target the red dot at 15 yards, then roll upright and hit steel at 100. Repeat. The rhythm starts to click, and you’ll appreciate why competitors rely on it.
Final Thoughts
Running a red dot alongside your scope isn’t just a fad—it’s a clever way to make your rifle more versatile. For competition shooters, it saves seconds. For hunters, it saves opportunities.
Quality mounts are what make the system work, so don’t trust a bargain-bin bracket to hold both your optics steady. A solid mount—like those from Weaver, designed for precision and repeatable zero—makes all the difference.
Spend a few extra bucks on good hardware, put in the range time, and before long, you’ll be switching from scope to dot faster than you thought possible.